Showing posts with label Home Improvements. Show all posts

Thursday, April 04, 2019

Master bathroom remodel...a year later!

There are lots of things I’ve missed recording over the past few years, birthdays and family adventures in particular, but for today I thought I’d do a quick post about the bathroom remodel we did last March.  Hard to believe it’s been a whole year!  Jim had some time between jobs, so we decided to jump in and renovate.  We really needed to reinsulate the walls and ceiling, and I was tired of the ripped and peeling border.  We had most of the materials on hand already (the PVC ceiling boards were leftover from a job, I think.  We didn’t have to put much money into the project, which was the best part!  We spent $5 on discount paint, and I think almost everything else was "free."  I did buy a new trash can for $1 at the Dollar Tree, too. 😉

Back in 2009 we had finally put up a wall border in our bathroom, and this is how it looked then: cream-colored walls, beige floor, lots of neutrals.

Fast-forward 9 years...the pretty border was all ripped up, there was some moisture damage in the walls, and we were ready for a change.  Demolition began, and we completed the whole project in a week!  (Using the term "we" very loosely, of course...most of the work was done by "HE!" 😉)

 The new beadboard ceiling turned out so nice!  We decided to go with a deep brown paint, named "Coffee Grounds," for the walls.  With the white contrast, it ended up looking so nice.  A year later, I still love this look.

 Since these pics were taken, we also hung up my hair dryer holder, so the wall above the scale doesn't look quite so bare now.
 The sink doesn't always look this uncluttered and tidy, either...still, I'm having a lot easier time keeping things neat now that we have more storage space.
Like this built-in shelf that Jim made from extra beadboard!
Even though this is a pretty small bathroom, and the slanted ceiling doesn't help, I feel like the changes we made helped improve the look and feel of this room a lot.  We are thinking about expanding this bathroom at some point to include a garden tub (once the boys' new room is complete in our future addition), but for now this update makes me so happy!

Friday, February 07, 2014

House Project: Office

Over the past couple weeks, we've been working on finishing another room in our house.  I am super excited about how it turned out--Jim just finished up the last bit of trim yesterday!!  I wish I had thought of getting a "before" shot--before he pulled out the old desk and everything else, but alas, I did not.  

We had been tossing around ideas for this space for a while, but I wasn't planning on getting to it anytime soon. But one day a couple weeks ago, I was thinking about cleaning, decluttering, and reorganizing some stuff on our very messy desk.  We got talking about how we could make better use of the space, and Jim said he had been thinking about putting the printer up on a shelf to make more room on the desk.  I had had the same idea quite some time ago, so that sounded good to me . . . but then we started brainstorming a little more, and next thing I knew, we were in the midst of a whole room renovation. ;)  

Some background: this room is tiny.  In fact, we used it as a closet space for a while.  It's really just a little back entry area between the extra bathroom and the stairs that go down to the garage, which is below our house.  It was our least-finished room--we had put wood on the ceiling a few years ago, but the walls were still unfinished drywall, and we hadn't figured out for sure what to do with them.  We kind of figured it out as we went along . . . that's the way we roll around here. :)  Plan, what plan?  Let's make one as we go.  With the exception of paint and some rollers, we didn't spend any extra money on this project.  (Jim says we should count the jointer he bought last month, and the shellac used on the desk . . . but I'm not coating those. :)  We used what we had, and those things weren't bought specifically for this project!)

First, he brought in some tongue-and-groove pine.  This was stored in my grandparents' old camp next door.  It was used on some of the walls in there, and there was a lot leftover.  Since Grampa told us we could use anything we could find over there, Jim brought this lumber home a while ago and we used some of it in Julia's room.  This office space was the perfect place to use some more. :)
 Putting the wood up on the walls.  Wow . . . looking so much better already!!
 Other end of the desk area: 
 This was our one big unfinished wall--where we keep our maps for school.  We were going back and forth between using some kind of wood (there wasn't enough pine) or painting it.  Jim really dislikes mudding and taping--he is good at it, but just finds it tedious--so wood would have been nicer for him, but then I had the idea of using chalkboard paint.  He thought that would actually be cool, so that's what we decided to do.  
 Desk area once all the wood was up:
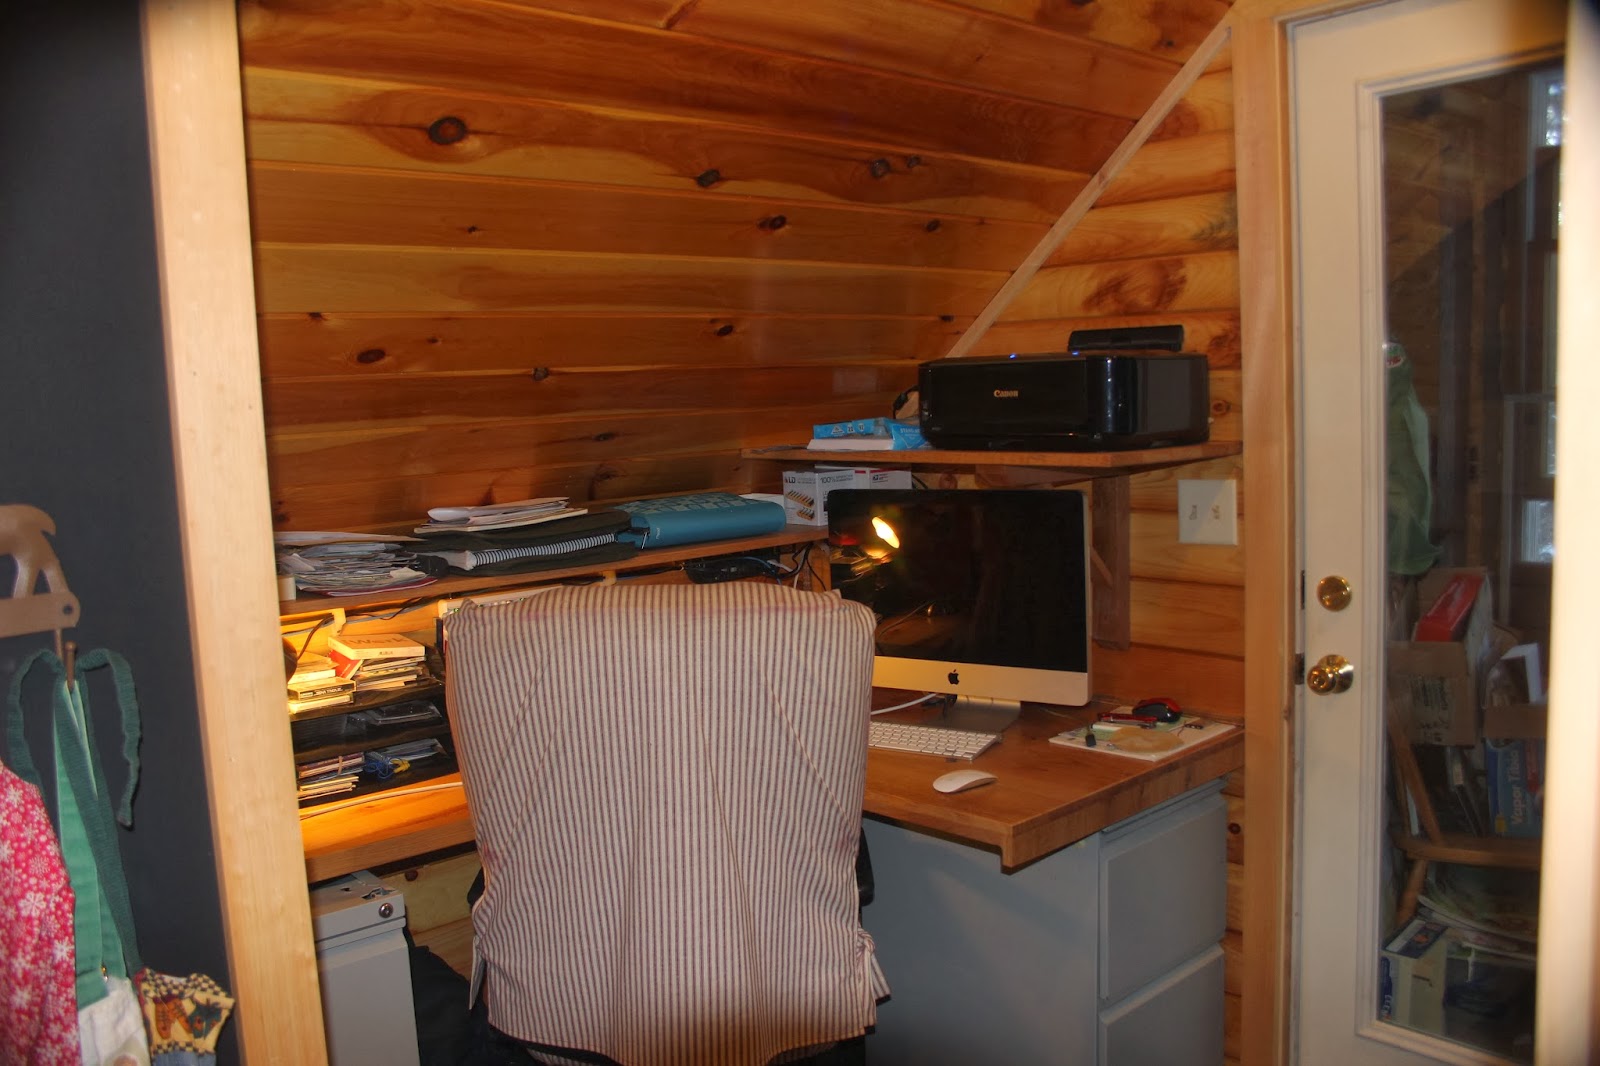
 The above pictures were all taken last week.  After getting the wood done, Jim custom-built a beautiful oak desk in an L-shape to fit the space.  And a printer shelf, and another shelf.  This makes SO MUCH better use of the space and really opens it up.  I can not only use the computer here, but there is plenty of room for me to do menu planning or bill paying, or for Jim to do paperwork.  I LOVE IT.  (Pics of the desk further down.)

This week, it was time to think about paint.  At first we were planning to buy a quart of chalkboard paint at Walmart, and we were thinking about using something other than black, like maybe dark gray or a gray-blue.  Then we found out it was possible to make your own chalkboard paint using baking soda.  Being the DIYers that we are (not to mention cheap . . . er, frugal!), that sounded like the better option.  So Jim went looking for "oops" paint at Walmart and found a gallon of black.  (It cost about a dollar more than a quart of chalkboard paint, so definitely a better deal!!)  We used about a quart of it and added 2 cups of baking soda.  It made the paint really thick and goopy, but it worked fine, and it only took one coat to cover the walls!  Once the big wall was dry, the kids had a blast trying it out. :)
 Today it was time for the rest of the trim.  This is my apron wall.  The aprons have always hung here, but we have them hung lower now, so the kids can reach theirs more easily.  Plus it leaves room for writing stuff above--like my hubby's note. :)  I may use it for writing menus or other stuff in the future--but for now I like this message! :)
 Jim decided that our genuine Aussie boomerang would fit perfectly above the bathroom door!
 The finished desk area.  I should have gotten a picture without the monster of a chair in the way!  Oops.  Eventually I would like to maybe paint the file cabinets with black chalkboard paint as well (I have a spray can of it that we could use).  It would make them blend in better, plus it's more fun. :)
 Looking at the desk from a different angle--back door:
 Kids' artwork on the big wall (we haven't put the map(s) back up yet--still figuring out how we want to do that.  I really love how the trim around this wall and the apron wall makes them look like a real chalkboard!
 One last pic, looking from the bathroom doorway toward the back door--please excuse the junk on the other side of the door.  ;)
It was so exciting to finish off this little space and make it a lot more useful.  It sure looks a lot better, too!!  Total cost of this project:

  • Paint: approx. $3 (for the amount we used in here)
  • Baking soda for paint: not sure, maybe $1? 
  • Roller: approx. $1.21
So for just a little over $5 out of pocket (plus a whole lot of time and energy and labor, plus tools & electricity of course) we have a whole new room!  Can I just say what a huge blessing it is to have a talented hubby who can make stuff like this happen?  It's not often he has the time to tackle a big home project.  Having a slow work season is difficult in many ways, but at the same time it can be awesome because we get extra family time, and time for projects, too!  

Saturday, April 27, 2013

New blessings in my kitchen

Within the past week I've been really excited to gain two new additions to my kitchen!  First of all, I've been wanting a trash cabinet for quite a while.  I wanted the little bit of extra counter space it would provide, plus hiding our unsightly trash can sounded like a nice idea! :)  Jim started working on one months ago, but had set it aside for other projects . . . he finally got back to it and finished it up last Saturday!  
 I LOVE it . . . and especially the beautiful oak/cherry top that is soooo pretty!  Yes, it still needs a handle--we didn't have any left from the kitchen cabinets, so we'll have to order one. :)
 The other new thing is the pretty cabinet below.  Here's the fun backstory: For the past couple years, I've had the kids' school workbooks stored on the end of the green counter.  It's handy to the table, so even though it cluttered up the counter, I figured it was worth it for the convenience.  Last Saturday when I was cleaning up the kitchen, Jim commented how it would be nice to move all the books and gain some more counter space, but we didn't really have a convenient place that was still close to the table.  I suggested he could eventually build me a small bookshelf to put at the end of the counter, and figured that would be a "someday" project.
 Well, fast-forward to this past Wednesday.  One day Jim came home from work, and mentioned that there was a cabinet in the back of the car that he had forgotten about.  A furniture builder who Jim's boss buys stuff from had been getting rid of it (no idea why, it's really nice!) and offered it to Jim.  So it had been sitting in the car since sometime the week before we were talking about wanting to put a bookshelf in this spot.  Jim didn't think it was deep enough to hold the school books . . . but when we brought it in and tried it out, it was the perfect size!!!  And we even have space left over to fill with more books and things. :)  It's so neat how God cares about the little details . . . and I am still laughing over the fact that this cabinet was in the back of the car the whole time we were talking about needing something to put in this spot. :)
 The kids also think it is a fun place to stash stuffed animals and toys.  Look who was hiding in the school books! :)
I'm so thankful to have these new blessings that are helping me keep the kitchen neater and more organized.  It's very handy having a carpenter for a hubby . . . and his furniture delivery job also comes in handy, as we have been blessed with several different free pieces through that!


Tuesday, October 11, 2011

Finally, a completed project!!!!!!

So . . . I'm sure you might remember way back last winter when I posted this idea for a little bench re-do for the kids' room. And then this summer when I posted about it again, having actually started on it? And then I didn't post anything for a long time, simply because after I got the painting and urethaning done, I put the project on the back burner again, having limited time to do the cushion and pillows. Well, I am pleased to announce that FINALLY, I buckled down and got to sewing, and now I can cross this project off my list. :) As of last Monday, it is done, done, done! And I'm pretty happy with how it turned out! Here are some shots:
This cushion involved first making my own piping. I got the tutorial for how to do that here (it wasn't hard, just took a little while). And I got the bench cushion tutorial here. It's definitely not perfect, but I'm fine with that.

As for the pillows . . . I scored these cream-colored throw pillows at a yard sale back in September for a dollar each. Yippee!! I then embellished them with leftover fabric. It was a bit different than my original plan, but I actually like it better.
And here's the lowdown on the cost of this project, just because it's fun to keep track of stuff like that. Mind you, this isn't exact, but a rough-ish guesstimate of how much I spent.

Bench: free (old toybox that my Grampa made years and years ago)
Paint: leftovers from other projects
Urethane: no idea, but I didn't use much :)
Fabric: gift from my mom several years ago
Rope (for the piping): maybe a couple dollars for the amount I used?
White fabric for piping: in my stash, bought on clearance at Walmart last year
Red bandana fabric: also in my stash, leftover scraps from another project
Foam for cushion: a little over $7
Batting to cover foam: in my stash, no idea how much it originally cost
Pillows: $2

Total: around $10-12, give or take a little. Not bad, if I do say so myself! :)
I'll admit that I don't know how much this little nook is actually going to get used for its intended purpose. But it does dress up that end of the room, and the kids seem to have fun playing with and on the pillows & cushion, so it's all good. :)

Tuesday, August 23, 2011

Input requested: Kids' room bench/storage, part 2!!!

OK everyone--here we go again! :) Remember waaaaay back last winter when I asked for your input regarding this kids' room bench that I was hoping to re-do? Well, I finally got around to starting this project over the past few days. I decided to go with a blue outside and a cream inside, after looking over your input both on the blog and Facebook and sort of combining the ideas. This was my base coat--plain ol' cream:

And this was how it looked when I had it all painted with 2 coats of cream and 2 coats of blue.
But I had in mind that I wanted to distress it (a la this post/instructions) and then cover it with a coat of poly to seal everything. So today I took the sander to it. And now I'm not so sure. I was going for the rustic/weathered look to go with their cowboy themed room (not to mention the fact that they will beat on it so it might as well look beat up to start with, right?). But the kids informed me, "Mommy, you're ruining it!" (Sam) and "I don't like it looking like that!" (Julia)
And I'm wondering if it looks less weathered and more like just a bad paint job?
I can always repaint it with another coat of blue to "fix" it, but I wanted to see what you all thought. Keep in mind that it's going to have a cushion on top and the bottom will be used for large toy storage so not a whole lot of the inside will be showing. Mostly what will be seen is the blue edges. I'm going to get hubby's input too, but I'm just curious to see what you all think!

Updated to add: I decided to take a couple pictures of my 2 cushion options to add to this post; that will help give a better idea of how it will look with a cushion on it, and also I am curious about which you think is the better fabric for the seat cushion? Whichever one isn't used for the cushion will be used for coordinating pillows to lean against the wall.

Fabric choice #1:
Fabric choice #2:

Friday, January 28, 2011

Input requested: Kids' room bench/storage

I am embarking on a project (or perhaps I should say *we* are embarking on one :)). Recently I stumbled upon Ana-White.com, and oh. my. How did I miss this blog up till now? There is so much cool DIY furniture inspiration there!!! Anyway, I came upon this cute little cube bench that someone had made, and it got my creative juices flowing. I thought, "I could make that!" (Or to put it more precisely--"I could help to make that!!" You see, I know this really awesome carpenter . . . :)) Anyway, I thought about it a little more and realized that instead of making the actual bench, we already had the perfect "bench" that we've been using all along in the kids' room. It's actually an old wooden toy box, flipped on its side.
This toy box has a lot of history attached to it! My grampa built it probably 25+ years ago, for the nursery at the church I grew up in. When Jim and I were newly married, the church had just moved to a new building and they ended up getting rid of the toy box, which was passed on to us. We've used it for many thing over the years--hat and mitten storage, etc.--but most recently this is how it's looked. Besides storing stuff inside, we also put things on top of it for extra toy storage.

So, I have the bench . . . but obviously it's in need of a little TLC. Which is where you guys come in! I would like some input on how you think we should refinish it. I'm planning to sand it a bit to smooth everything up and get rid of the crayon marks (which were actually made by our kids, not some long-ago church nursery kids :)), but I am undecided whether we should then paint it or put a clear urethane on it. We could go with a white or cream paint (I think we have some of both on hand), or we might even have enough blue left from when we did the walls. I even thought about red, but I don't think that would probably look good with the fabric I'm planning to use. Plus, we would have to buy red paint, which would make the project less frugal. :) But maybe just natural wood color would be best, considering all the other wood in their room.

For the bench cushion, I am planning to cover it with the fabric on the left, and probably make some pillows for against the wall, out of the coordinating fabric on the right. My mom gave me both fabrics ages ago, when Sam was a baby, and I'm so excited to finally have the right project to use them on!!! Sam is excited too, because he thinks the cowboy in the scenes looks just like Cowboy Small. :)
For reference, here are some other pics of their room--so you can see the wall color and other colors that show up a lot--mostly primary.

And just because they're so cute--one last picture. :)
So . . . I'd love to hear your thoughts on how the bench should look! I can't guarantee which suggestions/opinions we'll end up going with, so don't feel bad if we don't use yours! . . . but I am just curious, as I'm honestly not sure what would look best in there! And I'll definitely post again when this project gets finished, so you can see how it turns out!

Wednesday, March 17, 2010

One step closer . . .

I've been meaning to post pics here for almost two weeks, and keep forgetting . . . anyway, I wanted to show you our latest home improvement. On March 4, Jim and our friend Nathan installed hardwood flooring in our living room!!!! We were able to buy some tigerwood flooring off Craigslist for less than half the normal price, from a builder in a nearby town who had it left over from a job.

I took the kids to my mom's for the day, so we would all be out of the guys' way. When I left that morning, here is what our living room looked like:By that night, this is what it looked like:Isn't it gorgeous?!!! I love it! Now all of the floors in our house are finally finished. The next big project will be kitchen cabinet doors. After that, we have lots and lots of trim to finish, all over the house . . . and the back hallway needs to be mudded/taped/painted (unless we end up covering the walls in wood, which is a possibility). And of course there is still some siding and trim to finish on the outside. We still have a goal of getting the house completely done by Thanksgiving . . . I'll keep you posted on how it goes. It definitely feels great to have it one step closer now that this floor is done!! :)